Halloween on a Budget !
Happy almost Halloween Fxers and in honor of my favorite holiday. I thought I'd offer you 6 last minute Halloween looks three for girls and three for guys. Because honestly we are all college students here and while it be cool to go all out this Halloween a lot of us don't have the time, patience or money to do so . So I came up with six looks that are super easy and low cost this Halloween . I spilt it into girls and guys but its Halloween so really you could do any of these looks if you wanted to!
The Guys
Slit throat
What you will need
Liquid Latex Budget tip * If you don't have latex Elmer's Glue is a good sub.
tissues
fake blood Budget tip* food coloring and cornstarch makes fake blood.
red blue green food coloring
wire optional
optional foundation
How to
Step 1 Put a layer of latex across your neck the length is up to you . Then put a layer of 1ply tissues over it. wait for it dry. Repeat this process until you feel that your fake skin is built up enough to play with. I did 6 layers.
Step 2 Cut open your fake skin . Be very careful sense this is around you neck area. Optional you can use foundation to blend the latex into your skin it will make it look more realistic
Step 3 I used my injury stack to create bruising around my neck. But we are on a budget here so. Take your blue ,red ,and green food color and begin applying them all around your neck and on your fake skin. if your colors mix that's a good thing.
Step. 4 Optional but to make your cut look deeper take a dark food color, black marker , eye shadow what ever you'd like and color in the area where you cut your fake skin open .
Step 5 Add lots of blood everywhere there is never to much fake blood your neck just got sliced open there should be tons of fake blood.
Step 6 Optional you could add thin wire and stick it through the latex to make it seem like there was a struggle.
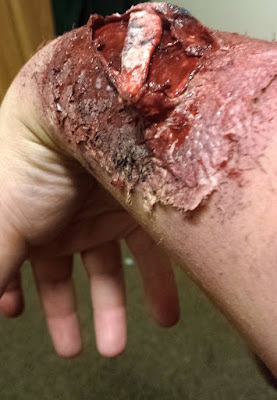
Exposed Bone
What you need
Liquid Latex Budget tip * If you don't have latex Elmer's Glue is a good sub.
Tissues
fake blood Budget tip* food coloring and cornstarch makes fake blood.
red blue green food coloring
Gum the white color
How to
Step 1 Put a layer of latex across your arm the length is up to you . Then put a layer of 1ply tissues over it. wait for it dry. Repeat this process until you feel that your fake skin is built up enough to play with. I did 6 layers.
Step 2 Cut open your fake skin . Be very careful because you don't want to cut your actual skin open. Optional you can use foundation to blend the latex into your skin it will make it look more realistic
Step 3 I used my injury stack to create bruising around my arm. I also used a couple of different eye shadows intensive the bruising. But once again we are on a budget here so. Take your blue, red, and green food color and begin applying them all around your arm and on your fake skin. if your colors mix that's a good thing. You are also going to want to bruise inside the cut as well.
Step 4 Chew some gum because this is going to act as your "fake bone". After a few chews you will be able to mold into the shape of a bone.
Tip* Make sure you your hands are clean of any other products you were using before working with the gum . I did not and had to repeat this step 3 times. We will be adding slight color to this later so you want a blank canvas.
Step 5 With you latex glue your bone into place the angle and direction is completely up to you. and then being to use your food coloring to slightly bruise your bone. if you don't know how to make bruising check out my blog post on how to make fake bruises .
Step 6 Blood everywhere go blood insane. Fake blood is the best part of any look.
Missing Eye
what you will need
Liquid Latex Budget tip * If you don't have latex Elmer's Glue is a good sub.
Tissues
fake blood Budget tip* food coloring and cornstarch makes fake blood.
red blue green food coloring
Black face paint or eye shadow.
How to Missing eye
Step 1 Put a layer of latex across the bottom rim of your eye . Then put a layer of 1ply tissues over it. wait for it dry. Repeat this process until you feel that your fake skin is built up enough to play with. I did 6 layers.
Step 2 Cut your new skin open once again its kind of an important area so be care. Optional you can use foundation to blend the latex into your skin it will make it look more realistic
Step 3 Take your blue, red, and green food color and begin applying them all around your arm and on your fake skin. You could color the inside of the wound black to give more depth.
Step 4 . Cover your entire eye with black. you may need to do this a few times to get the look that you want .
Step 5 Blood, blood and more blood your eye just fell out so there is no such thing as not enough.
The Gals
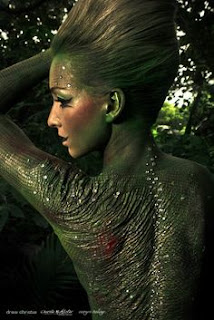
Rotting Alien
What you will need
Liquid Latex Budget tip * If you don't have latex Elmer's Glue is a good sub.
Tissues
eye shadow or shadows of your choosing
shimmer dust or glitter
How To
Step 1 Using the eye shadow of your choosing begin by covering your whole face with it until you get a good visible color .
Step 2 Put a layer of latex on random parts of your face . Then put a layer of 1ply tissues over it. wait for it dry. Repeat this process until you feel that your fake skin is built up enough to play with. I did 6 layers.
Step 3 Blend the latex in with the color of your face Use a sharp object to pick at until you get a tear. this will make the skin look infected and bothered.
Step 4 Pick an additional eye shadow color shimmers work better. Dust it inside the tear and around the infected area . This will act as the blood or puss. by we are rotting glitter and sparkles because we are a pretty alien ok.?
Deer
What you will need
Brown eye shadows 2 or 3 different shades
white cream eye shadow
Black eyeliner or eye shadow
How to
Step 1 fill in your eyebrows with second darkest shade of brown you have .
Step 2 Make a line going from your eyebrows all the way the sides of your half way down transition to your darker shade of brown. and being blending it out on both sides leaving the middle of your nose open.
Step 3 Fill the middle of nose in with your white cream eye shadow.
Step 4 Fill in your nose how ever you would like with your black eyeliner stick I dipped my down to make it look more deer like.
Step 5 Make a line going your the bridge of your nose to the top of your lip. And fill your upper lip with the black eyeliner stick.
Step 6 Blank out your bottom lip by covering it with white and putting foundation over that .
Step 7 Contour you entire face with your medium brown until you get a nice brown base.
Step 8 Add white spots up your forehead and on your checks.
Step 9 You can make antlers by glueing twigs and sticks on to a head band. I just happened to have a pair that i got on clearance last year!!
Ice Queen
 |
| DazzleDust08 / YouTube |
My last super easy Halloween makeup look would be this Ice queen. And I'm going to link you to this video below because i did not not have to time to recreate or put my own spin on this. Or come up with a new look based on this because i just ran out of time.
https://www.youtube.com/watch?v=nUjND8NshjY
I hope you guys have an amazing Halloween I know i will until next time fxers make sure to do something extra spooky this Halloween


