Monday, November 9, 2015

Sources of Inspiration 2 Movies

Movie Inspiration 


So this week I wanted to do my second inspiration post. Since the 9th grade I wanted to be a movie maker because I wanted to take real life topics that happen to real life people and bring them light to them. To let people know they aren't alone. Most of all  help other people to understand something that the might not ever experience. I find it remarkably inspirational  when I watch a film that dose that because that is my goal in life. For my second inspirational post I want to discuss design aspects right down to the story line that make these movies so great and powerful

The first movie I wanted to talk about was actually a move I saw for the first time this weekend it is called Before I Disappear
                                                                         5 out of 5 
This has a lot of bad reviews outside of its 4 star rating on Netflix actually because of the fact that nobody liked the ending, and hated how it jumped topics They also didn't understand some of the odd camera movements and angles. As for me all those things that they hate is what I loved about this movie. And what I thought really took it to the next level

This movie follows a young man Richie who is writing a suicide note to his ex who has passed. He plans on ending his own life to join her. Until he gets a call from his sister asking him  to watch his  niece Sophia for a few hours. Sophia gives Richie something to live for. The whole movie Richie is slipping in and out of  near death and depression. Which is why the directors choice to jump in and out of senses  from topic to topic made perfect sense to me. Because you have to understand that Richie is about to commit suicide and suffers from depression it makes perfect sense that his personality is going up and down.  I think this movie did an amazing job of explaining the human condition .


Spoiler *** 

There is one part where it is Richie 2nd attempt at ending his life he takes a whole bottle of pills and gets a phone call from his niece in his looped state he is attempting to make it across town to his niece this is where the shakey hand held sense come in but it works trying to make you feel like your actually there.

The ending of this movie I quite like because it wasn't exactly a happy ending although it could of been it leaves you to decide what happened


Spoiler ** 

Richie is in the bath tub quite like how the movie began about to end his life when the phone rings and his sister invites him to dinner it then cuts two Richie burning the suicide note. Only to start a new one I love you I miss you Richie then it ends with him seeing a ghostly image of his ex. The ending can be taken to ways Richie finally fought his demons and can move forward with his life. Or he ended the on going battle. But you can choose which one thus creating your own ending which i like.
                                                                           5 out of 5

Remember Me I have a love hate relationship with this movie and this why I don't want to give it  five stars but it the ending ripped my heart into 1,000 little pieces. So just for that I must.  this movie focus around the love story of two broken people a girl Ally  who is trying to deal with the lost of her mother. And a boy Tyler who is trying to deal with the fact that his parents spilt up after brother  committed suicide. They meet each and fall in love while helping each other deal with there demons. The movie is centered in New York in 2001. And for all of you that never saw this movie you are probably thinking that it is just another stupid love story. I will not lie its a love story of two broken people that found each other but the ending is so unexpected and gut ranching  that makes it so much more than just another love story.
The first time you watch this movie you are just shocked because you would of never thought that would of happened. I know your wondering what happens ok. do not read the spoiler if you have never seen the movie I'm begging you go watch it first.

Spoiler***** The Ending

Tyler has  just made up with his father and is waiting for him  to arrive at work it cuts to a shot of his sister in school with her teacher writing 9/11 on the board. And then Tyler  dies he dies in 9/11 twin towers plane crash and it ends with a poem in his voice from his journal . Its shocking its just everything is going great and you  expect this happy ending and he dies. I think it made the movie fantastic because you become emotional invested in Tyler like he is your good friend it causes you to feel such pain when he dies in the most horrible way and we get a tiny glimpse of what it was like to loose someone on that tragic day. Again the free handed camera work right around the 9/11 scene brought another layer to this movie .

And the thing that makes it so much more real no knew that was going to happen. People in that building could of been fighting , dealing with lost,  planning on fixing relationships. They were people that had these mazing life's and struggles and hopes and dreams and they got taken away with no warning and  that's what makes this movie so real and raw and just not like another love story because it makes you think about the what ifs in life.

                                                                        4 out of 4

 I have never saw I movie quite like this it deals with the very serious issues of being transgender but dose it at such a young age which makes you  that much more attached to the characters. Again this movie had gotten beaten down and accused as being an insult to the transgender community. For mere fact that the ending wasn't happy and did not lean towards acceptance. I am 100% in support of the LGBT community don't get me wrong. But once again I think the ending made the movie that much more powerful.
This movie follows a ten year old girl Zoe who's family moves to a new town. Where he  decides he wants to become Mikae and introduced himself as just that to his friends . This story is about a girl making a transition into a boy  and the new struggles he will now face as Mikae. Mikae mother was a horrible women that could not accept the fact that her little girl was actually her little boy  which lead her to do some rash things.

Showing Mikae having to cut his hair, or bandage his torso, or try to imitate what all the guys were doing. showing these scene  is what made the movie because we read about this or hear about it but actually seeing it is a different story and makes you feel so much for that person.


Spoiler***** The Ending

Mikae's mother outs him as been born with girl parts in front of his friends  this ending was heart breaking and it was uncalled for a mother none the less to do this to her son. But this is what made the movie great because back in 2011 and even today  horrible but true a lot of people wouldn't of accepted this. As much as a I agree that we should support positively for this topic. This movie showed what it was like for people that are transgender and the kind of things that happen when people don't accept them for who they are. Its a horrible fact to face but people actually are like this and do treat people this way. It brought a horrible and ugly truth to light. And maybe just maybe for hard headed people that felt that way it brought  them to change there actions.


Thursday, November 5, 2015

The 411 on Liquid Latex

                              The 411 on Liquid Latex

Hello Fxers and welcome back to my blog I know that I always give a brief  summary of how to apply liquid  latex for all the looks I have shown you this far . But there are so many things that you could do with this product its like the ruler of the specail effects world. there are alot of pricey products out there but if you know your facts on liquid latex you can save a lot of money. When it comes to create certain effects and looks .  Lets get started on the many ways you can use this gem of product.
 
https://www.stagemakeuponline.com/img/02/ll.jpg

Liquid Latex Prosthetics

Yes instead of spending large amounts of money on prosthetics or prosthetic making products . You can make your very own prosthetics using Liquid Latex ! Warring it is harder to work with until you get used to. Making prosthetics with latex is simple easy and cost effective. I personally make prosthetics out of  gelatin and glycerin which is still very cost effective because you can use it multiple times but that is for a holy different kind of future blog post . Back to Latex!!! Lets get started

Pick something you want to prosthetic. It could be anything just for the sake of explaining this to you i am going to say we want to make a prosthetic of a bullet hole, because it is probably the easies.

So you are going to pick a hard surface That you don't mind working with makeup on you are going to take your liquid latex and put a round circle the size of a bullet hole on to the surface your working with and then let it  dry. do this 3 to 4 times. Tip* you could build it up with tissues if you want a thinker surface to lay around with. But it is not required .

When completely dry peel the prosthetic off  of your surface and bam ! lol that is kind of iconic because we are talking about bullet holes haha okay yes im painfuly funny moving on !

Glue the prostheitc on to your face using lates , sprit gum or some kind of fx glue.

You can use this method to make just about any prosthetic you can work on your face or use some type of mold the options are endless

https://i.ytimg.com/vi/rsWAZ6ZD1sI/maxresdefault.jpg


Liquid Latex for tears in the skin

Lets face it you can add a cut a tear or rip to the prettiest costume in the world and it will still make it look cooler.

 So if you read any of my other posts you would know i say this alot but this is how you do it because honestly since halloween paseed my blog is probably currently the least intresting.

So you put a layer of latex across any part of your body. Basicly the face neck and arms becsue i cant see you putting it anywhere else  . Then put a layer of 1ply tissues over it. wait for it dry. Repeat this process until you feel that your fake skin is built up enough to play with. I usally do 6 layers because we have to cut this open . I dont want to aciddently slice my neck or face open. so the more layers the more safety.


Liquid Latex Body paint ????

I have heard of body painting and I have heard of using latex for special effects. But I never would of thought to put the to of them together . In my research I wanted to find something out that I didn't quite know about latex. This just happens to be it.

At first it was so strange to me because latex sticks to hair and wouldn't that be so painful if your pint on a body part that has hair like arms for example?

But then it occurred  to me that it dry's quick it is able to peel off easily and it is good a base to paint over  sometimes the strangest things can make art I suppose.

https://s-media-cache-ak0.pinimg.com/236x/1a/98/f5/1a98f5b96fdd7a1686d76c9f29aba3b8.jpg

Don'ts of Latex  


Dont put latex in hair because it will not come out you will have to shave your head not kidding. I once got a tiny bit in the tip of my hair once thank god it was only the tip.

Be careful if your putting latex around sentive area like the lips and eyes. Getting latex  in your eye can blind you . Becasue just like any other surface  it will create a thin layer and you dont want a thin layer of latex over your eye.

If your going to be putting latex over your eyebrows please glue them down using sprit gum as long as you have a sprit gum remover it is perfectly safe becasue latex is so hard to get out of your eyebrows.

Until next time Fxers

Monday, November 2, 2015

Na na na na na na na na na na na na na na BATMAN ( Actualy the Joker )

Hello Fxers and unfortuntly it is the  dreaded month of November lets all have a moment of slince and bow our heads in respect  for Halloween that pasted this weekend R.I.P. until next year my old friend. Just becasue Halloween is over dosent mean specail effects die off until next year. So you best belive  that  I will be going strong. The only good thing about November arrving beside thanksgiving is that all Halloween  products go on sale the day after Halloween so you can stock up for the next year or next day or week if your some one like me.  Lets be honest here who doesnt like to mess around with specail effects makeup all year round  "circkets " Okay i get it im the only one .

Well someone asked me to do there makeup for Halloween this past Saturday and i thought awsome they said they wanted to look the joker form batman. And me trying to put  my own spin on things started to weigh the possiblitlys.Thier is like three basic jokers the newest being sudice squad tatted up joker which i find the hardest thing on the plant to accomplish  because i cant draw in real  life so how can i paint tatoos all over my body. The second being the most well know joker with  the iconic catch phrae why so serious  ? Which is absoulty doable but I dont go slight with things I go exterme or go home. The last joker is the basic joker white face , black eyes, red lips up to your ear. So I naturaly picked the seond joker but he didn't have scars . His  smile cut to deep and the sides of his face are kinda peeling off

                                               JOKER


What you are gunna need
 White face paint
Black face paint
Red cream paint
Liquid Latex
Blood
Green wig  
 
 
How to
 
Step 1 Paint your face white and hosntly this is the most annoying  part becasue you have to do so many layers to get a good coat.
 
Step 2 Messly  fill in your whole area with black cover thoose eyebrows to .  Kind of a gross tip if you lick your finger you can drag some of the black down into the white to make it look messer .
 
Step 3 If you can srunch up your face and your forehead wrinkles up you want to define thosse wrinkles with the white face paint if your like me and not gifted with this skill to keep it simple  we will skip this step.
 
Step 4 Go crazy we are challenging the joker here! Start to messily fill your lips in with the red cream paint.
 
Step 5  Start to apply your latex and tissues from the cornor of your lip to almost the end of your check. If you need to see a quick explaintion of how to apply latex you can look at my other posts because i explain it in just about everyone or stay tuned for this weeks second post where I will  teach everything you need to know about Latex .
 
Step 6. Cut your new skin open apply differnt shades of red brusing if you want and lots of blood
 
Step 7 This is the most important!! You must have the green hair garb a wig , dye your hair  or the spray in the color works just fine  .  Without it this look can go form joker to bad clown makeup in 2 seconds falt
 
 
Until next time Fxers Do you wanna know how I got these scars?


Thursday, October 29, 2015

6 Super Easy Last minute Halloween Costumes for College Students on a Budget Girls and Guys !

Halloween on a Budget !


Happy almost Halloween Fxers and in honor of my favorite holiday. I thought I'd offer you 6 last minute Halloween looks three for girls and three  for guys. Because honestly we are all college students here and while it be cool to go all out this Halloween a lot of us don't have the time, patience or money to do so . So I came up with six looks that are super easy and low cost this Halloween . I spilt it into girls and guys but its Halloween so really you could do any of these looks if you wanted to!

The Guys

Slit throat


What you will need
Liquid Latex  Budget tip * If you don't have latex Elmer's Glue is a good sub.
tissues
fake blood  Budget tip* food coloring and cornstarch makes fake blood.
red blue green food coloring
wire optional
optional foundation 
 
How to
Step 1 Put a layer of latex across   your neck the length is up to you . Then put a layer of 1ply tissues over it. wait for it dry. Repeat this process until you feel that your fake skin is built up enough to play with. I did 6 layers.

Step 2  Cut open your fake skin . Be very careful sense this is around you neck area. Optional you can use foundation to blend the latex into your skin it will make it look more realistic  

Step 3 I used my injury stack to create bruising around my neck. But we are on a budget here so. Take your blue ,red ,and green food color and begin applying them all around your neck and on your fake skin. if your colors mix that's a good thing.  

Step. 4 Optional but to make your cut look deeper take a dark food color, black marker , eye shadow what ever you'd like and color in the area where you cut your fake skin open .

Step 5 Add lots of blood everywhere there is never to much fake blood your neck just got sliced open there should be tons of fake blood.

Step 6 Optional you could add thin wire and stick it through the latex to make it seem like there was a struggle.


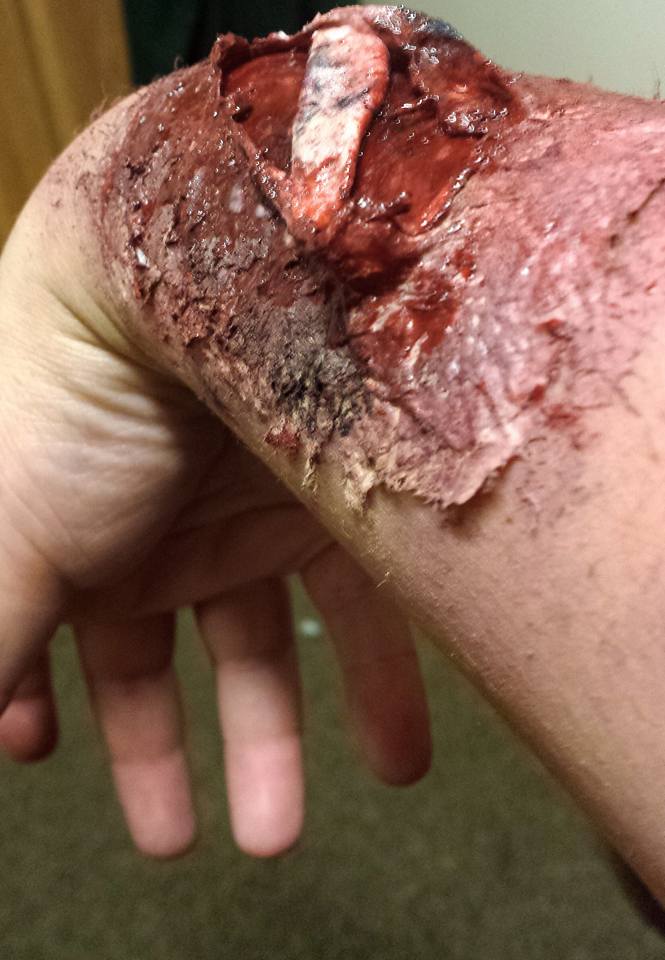
 Exposed Bone
 What you need 

Liquid Latex  Budget tip * If you don't have latex Elmer's Glue is a good sub.
Tissues 
fake blood  Budget tip* food coloring and cornstarch makes fake blood.
red blue green food coloring
Gum the white color 

How to 
Step 1 Put a layer of latex across  your arm the length is up to you . Then put a layer of 1ply tissues  over it. wait for it dry. Repeat this process until you feel that your fake skin is built up enough to play with. I did 6 layers.

Step 2  Cut open your fake skin . Be very careful because you don't want to cut your actual skin open. Optional you can use foundation to blend the latex into your skin it will make it look more realistic  


Step 3  I used my injury stack to create bruising around my arm. I also used a couple of different eye shadows intensive the bruising. But once again we are on a budget here so. Take your blue, red, and green food color and begin applying them all around your arm and on your fake skin. if your colors mix that's a good thing.  You are also going to want to bruise inside the cut as well. 

Step 4  Chew some gum because this is going to act as your "fake bone". After a few chews you will be able to  mold into the shape of a bone. 

Tip* Make sure you your hands are clean of any other products you were using before working with the gum . I did not and had to repeat this step 3 times. We will be adding slight color to this later so you want a blank canvas.

Step 5  With you latex glue your bone into place the angle and direction is completely  up to you.  and then being to use your food coloring to slightly bruise your bone.  if you don't know how to make bruising check out my blog post on how to make fake  bruises .

Step 6 Blood everywhere go blood insane. Fake blood is the best part of any look. 

                                                       Missing Eye


what you will need
Liquid Latex  Budget tip * If you don't have latex Elmer's Glue is a good sub.
Tissues 
fake blood  Budget tip* food coloring and cornstarch makes fake blood.
red blue green food coloring
Black face paint or eye shadow. 

How to Missing eye
Step 1 Put a layer of latex across  the bottom rim of your eye . Then put a layer of 1ply tissues  over it. wait for it dry. Repeat this process until you feel that your fake skin is built up enough to play with. I did 6 layers.

Step 2  Cut your new skin open once again its kind of an important area so be care. Optional you can use foundation to blend the latex into your skin it will make it look more realistic  


Step 3  Take your blue, red, and green food color and begin applying them all around your arm and on your fake skin. You  could color the inside of the wound black to give more depth. 

Step 4 . Cover your entire eye with black. you may need to do this a few times to get  the look that you want .

Step 5 Blood, blood and more blood your eye just fell out so there is no such thing as not enough.                                                              

                                               The Gals


  Rotting Alien 


What you will need 
Liquid Latex  Budget tip * If you don't have latex Elmer's Glue is a good sub.
Tissues 
eye shadow or shadows of your choosing  
shimmer dust or glitter  

How To 
Step 1 Using the eye shadow of your choosing begin by covering your whole face with it until you get a good visible color .

Step  2  Put a layer of latex on random parts of your face  . Then put a layer of 1ply tissues  over it. wait for it dry. Repeat this process until you feel that your fake skin is built up enough to play with. I did 6 layers.

Step 3 Blend the latex in with the color of your face  Use a sharp object to pick at until you get a tear. this will make the skin look infected and bothered.

Step 4 Pick an additional  eye shadow color shimmers work better. Dust it  inside the tear and around the infected area . This will act as the blood or puss. by we are rotting  glitter  and sparkles because we are a pretty alien ok.?

                                                                    Deer 


What you will need 
Brown eye shadows 2 or 3 different shades  
white cream eye shadow
Black eyeliner  or eye shadow 

How to 
Step 1 fill in your eyebrows with second darkest shade of brown you have .

Step 2 Make a line going from your eyebrows all the way the sides of your half way down transition to your darker shade of brown. and being blending it out on both sides leaving the middle of your nose open.

Step 3 Fill the middle of nose in with your white cream eye shadow. 

Step 4 Fill in your nose how ever you would like with your black eyeliner stick  I dipped my down to make it look more deer like. 

Step 5 Make a line going your the bridge of your nose to the top of your lip. And fill your upper lip with the black eyeliner stick. 

Step 6 Blank out your bottom lip by covering it  with white and putting foundation over that .

Step 7 Contour you entire face with your medium brown until you get a nice brown  base. 

Step 8 Add white spots up your forehead and on your checks. 

Step 9 You can make antlers  by glueing twigs and sticks on to a head band. I just happened to have a pair that i got on clearance last year!! 


                                                            Ice Queen 

DazzleDust08 / YouTube

My last super easy Halloween makeup look would be this Ice queen.  And I'm going to link you to this video below because i did not not have to time to recreate or put my own spin on this. Or come up with a new look based on this because i just ran out of time.

https://www.youtube.com/watch?v=nUjND8NshjY

I hope you guys have an amazing Halloween I know i will until next time fxers make sure to do something extra spooky this Halloween


Monday, October 26, 2015

Sugar Skulls Two ways Easy / Meduim diffculty

Sugar Skulls 2 Ways

 
Hello Fxers and welcome back to my blog. Today we are back at the how to looks. And I thought what a great day to do Sugar Skulls. The 1st  one Im going to show you today is basically how to cheat looking like you know what your doing this Halloween. Its a beginer Sugar skull that involes only three simple steps then for the other one . Im going to step it up a bit and get creative! So lets get started .


Products Needed

White face paint or cream eye shadow
Black face paint or cream eye shadow
Sugar  skull sticker kit from Halloween Spirit


Lets get Started

Step 1  Paint your whole face with white face paint and set it with white powder
 
Step 2 Use your black face paint and make a big circle around your eyes starting at your eyebrow and ending underneath your eyes . Fill it in with the face paint then set it with black eye shadow if you have. Fill in your nose with black face paint .
 
Step 3 Get creative with the stickers form your Sugar skull sticker kit. you can do anything you like. and you can also jazz it up a bit like i did. By gluing gems to my forehead to give the look an extra little something. here what it looks like ! 
 
                                           AND THIS IS WHAT IT LOOKS LIKE :)


My second sugar skull is something I came up with it is kind of like an Sparkle Skull.
 The interesting thing about this skull is that it was completely made out of eye shadow expect for
the white face paint around the chin and mouth and the bling of course! And it transitions between 3 colors.

What you will need
2 glitter shades of eye shadow
2  normal shades of eye shadows the same colors as your two glitter shades
Black eye shadow pigment
1 normal eye shadow of any color of your choosing
white face paint
Dusting powder
Some bling !
2 brushes of your choice

Lets begin!!!!
Step 1 Begin putting the white face paint from under your chin all the way up to the tip of your nose. Blend it out as much as you can.

Step 2 Take one of your glitter shades and  one of your solid shade and being to dip your brush in one then the other  I used blue tones for this !

Step 3 Begin to blend this right  where you stopped your white  face paint Blend about a 1/2 inch into the white. This will make a natural transition and not a harsh one.

Step 4 Continue to blend these to colors until you hit the top of your cheeks .

Tip * The whole section where your blending these colors should turn that color and it should be very noticeable so keep going if it is not quite there

Step 5 Repeat Step 2 with your second set of colors ! I used purple tones for this !

Step 6  Repeat Step 3 only this time your will be blending the color at your temples to make the transition to your next color!

Hint *  leave your eye socket and eyebrow areas open we will fill them in later !

Step 7 Blend these colors all the way up to your hair line avoiding your eye and eyebrow areas

Step 8  Take your two set of colors and begin blending them all the way down your nose until you get a color your happy with.

Step 9 Fill in the tip of your nose with black  eye shadow pigment.

Step 10  Use an eyeliner stick in any color. If you have black it could make the next couple steps easier. Make a big circle around your eyes starting at your eyebrow and ending underneath your eyes .

Step 11 Fill in this circle with any color you want. You can mix colors if you want. I did a deep but bright pink. Then dusted a sparkly sliver over it. !

Tip ****This is wear having a black eyeliner stick would make your life much easier so you can do these following steps with that if you would like !!!!!

Step 12 Begin to outline your circle with your black eye shadow pigment you can do this very easily with a Qtip. Then being to make tiny lines coming off  the circle you have just outlined. Using a Qtip to do this will make your lines thinker thus giving it a cooler appearance.

Step 13 Fill your lips in with black. Then begin to make a line form the corner of your lips to the middle of your checks with your black eye shadow pigment. Make a bunch of evenly spaced lines going through the line you just made. This is you mouth!

Step 14 Add bling wherever you want!

Step 15 If you have it dust your whole face with dusting powder. If you don't know what dusting powder is. It is a fine powder made completely of sparkles !!

                                             HERE IS THE FINISHED PRODUCT !!!

 
Until next time Fxers.  What did the bird say on Halloween?............ Trick or tweet!


Wednesday, October 21, 2015

Sources of Inspiration!!! Post #1

Music Inspiration

 (Real Friends Visual Analysis of Album Covers and Song Meanings )

Hello Fxers we are required to do 5 inspiration posts throughout the semester that completely steer away from the topics we usually talk about. I knew instantly that I wanted my 1st post to be about music. But to say in the range of the requirements  I had to think outside the box a bit so this week we are going to be talking about the band Real Friends and analyzing the designs of there albums covers. I will also be talking behind the meaning of some of my favorite songs by them. Real Friends inspirers me when I need a pick me up they are my go to band.

http://www.billboard.com/files/styles/promo_650/public/media/real-friends-press-2015-billboard-650.jpg

I guess I should tell you who Real Friends are because if your not into pop punk  music scene there is a good chance you have never heard of them. Real Friends are classified as pop  punk  they are from Illinois and they formed in 2010. For still being a newer  band the have blew up the charts of punk pop music. You know hint hint wink wink they are on the spring concert survey to possibly play at our school. Although if A Day to Remember won I wouldn't be completely heart broken either. If you want to make my whole life you know which 2 bands to vote for . Any who I don't want to overload you with to much info so  lets get started with some visual analysis of their album covers.
One of my favorite albums besides  Everyone Who Dragged you Here, and Put Yourself Back Together . Is Acoustic Songs it takes a lot of the songs from the album Everyone Who Dragged you Here and makes them acoustic.

Analysis
In my opinion as you will see with the other albums that I will be analyzing. A lot of Real Friends album covers seem to follow the theme of a small town feel. Maybe its even photography from there home town perhaps?  The scenery in the back is almost calming it gives you the sense of home. The road in the picture can almost represent a path to move on with our life . The text is apart of the black letter type face family . It is simple but it contracts against the color of the road which makes it  stands out.

Favorite song of album
My favorite song off this album is the acoustic version of Floorboard's. This song is about being at the lowest of low when you just go through a  rough break up .Its about ex's moving on but your haven't quite yet. its about the struggle of them coming in out of your life.    

Analysis
Three Songs About The Last Year Of My Life EP
Again  the cover kind of of gives this small town homie feel. Your looking through the fence at all the other aspects of the cover. The fence itself is kind of beat up which could represent what he has  been through the last year. As for the type it follows the same black letter type face family.
But in my honest opinion the tittle of the album is very hard to read against the fence. If they had bolded it, and you gave it drop shadow I think it would pop it out enough form the background to make it actually readable.    
Favorite Song of Album EP
My favorite song off this album EP is Dirty Water this is actually one of my favorite Real Friends songs of all time. The meaning of this song to me is that is about someone that came into your life and destroyed it rather it be relationship wise, friend wise , or family wise. And your kind of  calling them make them realize it . An trying to put your life back together.
https://www.youtube.com/watch?v=ORTFn3sy1Qg

http://i.ytimg.com/vi/PfZpE9TlGJM/maxresdefault.jpg
Analysis
Put Yourself Back Together
I love how they designed this album cover I think everything about it is nearly perfection
A bunch of things that you would see in your everyday life is laying on the road in a big messy pile on the ground. And I think that is perfect representation of you having to pick up the pieces of your life an put them back together. As in the other two analysis's the text is in the black letter family. I liked how they offset the name of the band form the title of the album with a line.

My favorite song of the album
My favorite song off the album is I've Given Up On You. I swear I am not one of those people the just know all the popular songs of a band. This song is one of the most well know real friends song at the moment and is the most played song on their Spotify. The meaning I get out of this song is that you are trying to get over the fact that your ex is seeing another person. https://www.youtube.com/watch?v=K_pLV94telg

Music is something we can listen to when one else understands  what we are going through. Lately Real Friend has been my biggest Inspiration to keep on moving forward even when times are tough. Until next time Fxers I'm going to leave you  with some of my favorite song lines from Real Friends
 https://41.media.tumblr.com/215a964f0f751ec51236c425111926be/tumblr_n5qg4q6vvo1s78xclo1_500.png


Monday, October 19, 2015

Special Effects After Care

Take Care of Your Face !

Hello Fxers and welcome back to Ready Set Fx! A horrible terrible thing happened 2 weeks ago  when I was knocking out special effects looks for this blog. I  noticed the day after I had dry patches all over my face from not taking care of it properly. I have acne prone skin but I had never experienced dry patches this was a first. But here is the thing I started to do obsessive research of  how take care of your face after applying special effect makeup but there isn't a lot of information  out there. The burnt of the information I had found focused around how to remove certain special effect makeup that cant be taken off with soap and water. But nothing about how to prevent your skin from getting damaged. So I came up with my own maybe everyone just assumes  that it is self explanatory but I honestly had no idea. So maybe this will help another unfortunate soul like me. So I'm going to give you some do's and don'ts of special effects makeup let's get started!
 

Do's   

Do make sure you have a clean face. Never apply makeup to an unwashed face
 
 
Do moisturize you face before and after you  apply the makeup. Ever since my mishap I personally use equate's Fragrance free advanced moisture recovery lotion.  Its only 97 cents for a 10 oz. bottle and it works wonders.
 
 
If you happen to be a person that has very sensitive skin. I would recommend to do a patch test on any products you plan on using just to make sure it could  prevent a bad allergic reaction or irritation of some sort
 
 
Always make sure to wash your even if you used a face wash to remove all of the makeup its still a very good idea to wash your after everything is removed this will get any of the access dirt out that you missed.
 
 
Facemasks are your best friend if you have done an extensive special effect makeup look this will help put the moisture back in your skin. You can do this after any sort of special effects makeup it will just have a better propose if your look is more extensive .
 
Take a few days break if you can between doing looks to give your face a rest.
 

Don'ts  

Don't ever fall asleep in special effect makeup with out taking it off first.
 
Don't ever rub excessively in the same spot get off makeup this can cause ore harm then good
 
Don't forget to apply lotion after this could avoid those annoying dry spots
 
Apparently it is very bad for you to pull latex off of your face so yeah don't do this.See video below of me ripping latex of my face I probably still will . But you shouldn't it could cause damage. Im just  a rebel though


until next time Fxers enjoy this cute Koala meme